Spring Boot (Kotlin) はじめの一歩
これは2018年01月30日にQiitaに投稿した記事を移行したものです
目的
Spring Bootを学習するきっかけが欲しいと友人にたのまれたので、 実際にペアプロしながら進めていくための資料として作成しました。
Spring Boot (Kotlin)入門 - MVC - Rest - DB Access
使用するもの
※IntelliJ Ideaの代わりにSTS + Kotlin PluginでもOKですが、手順は記載していません。 ※Mavenの場合、dependencyなどをpom用に読み替えてください。 ※Doma2のEntity / Dao実装はKotlinではなくJavaになっています。
環境構築
IntelliJ Ideaのインストール
こちらから https://www.jetbrains.com/idea/
Spring Bootプロジェクトの雛形を作成する
Spring Initializrで雛形を作成する https://start.spring.io/
以下の内容で生成します。
- Gradle Project
- Kotlin
- Spring Boot 1.5.9
- Dependencies => Web
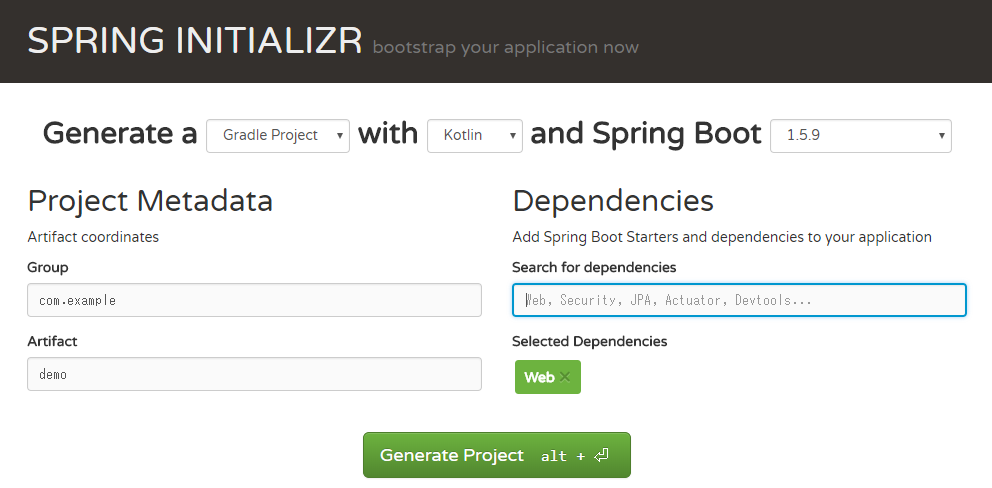
Group / Artifactはお好みで
雛形のzipファイルがダウンロードされるので、適当な場所に展開しておきます。
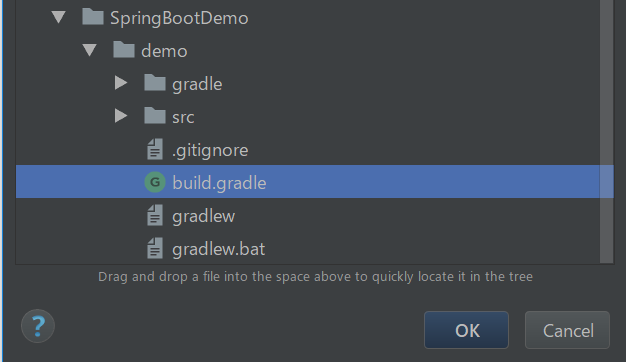
プロジェクトを開く
IntelliJを起動してImport Project
展開したプロジェクトの雛形の中にあるbuild.gradleを指定する。
Use auto-importにチェックを入れてOK
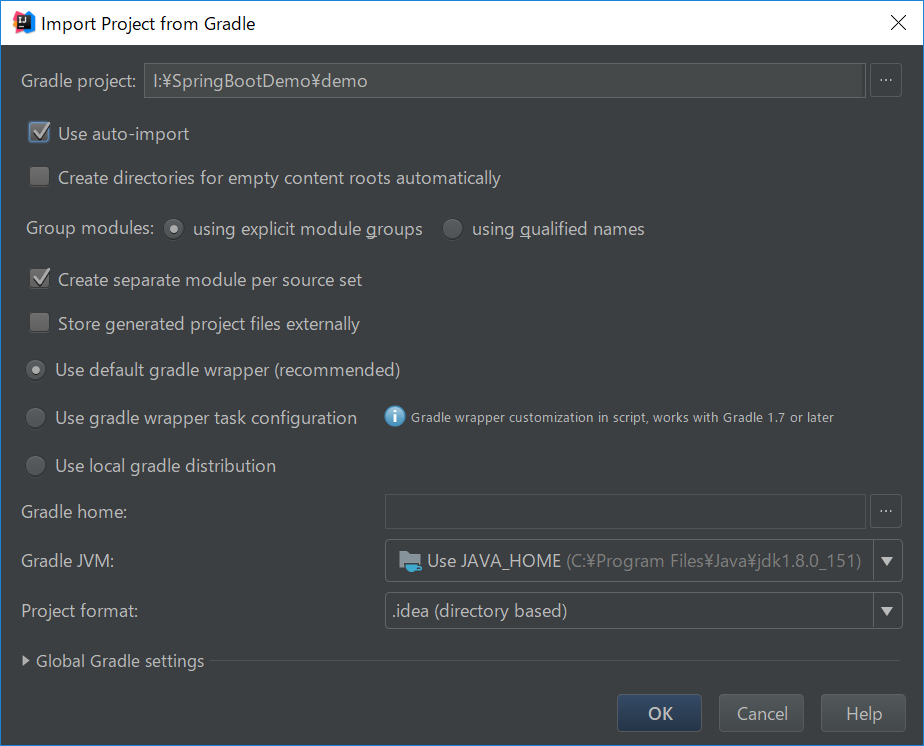
ビルドが始まるので、synced successfullyになればOK

View -> Tool Window -> Gradleを選択してGradleのツールウィンドウを開く。
Gradleツールウィンドウ内のdemo -> Tasks -> application -> bootRun を右クリックして Run 'demo[boot Run]'で起動する

14:44:18: Executing task 'bootRun'...

:compileKotlin
:compileJava NO-SOURCE
:copyMainKotlinClasses
:processResources
:classes
:findMainClass
:bootRun

  .   ____          _            __ _ _
 /\\ / ___'_ __ _ _(_)_ __  __ _ \ \ \ \
( ( )\___ | '_ | '_| | '_ \/ _` | \ \ \ \
 \\/  ___)| |_)| | | | | || (_| |  ) ) ) )
  '  |____| .__|_| |_|_| |_\__, | / / / /
 =========|_|==============|___/=/_/_/_/
 :: Spring Boot ::        (v1.5.9.RELEASE)

・
・
・

s.b.c.e.t.TomcatEmbeddedServletContainer : Tomcat started on port(s): 8080 (http)
2018-01-20 14:44:28.125  INFO 13432 --- [           main] com.example.demo.DemoApplicationKt       : Started DemoApplicationKt in 2.45 seconds (JVM running for 2.75)
※この時点ではControllerなどが無いので、何もできない。
Spring Boot起動中にIntelliJでコード修正が反映されるようにbuild.gradleの設定
plugin定義に以下を追加する
 apply plugin: 'idea'
 idea {
   module {
     outputDir file('build/classes/main')
     testOutputDir file('build/classes/test')
   }
 }
 if(project.convention.findPlugin(JavaPluginConvention)) {
    // Change the output directory for the main and test source sets back to the old path
    sourceSets.main.output.classesDir = new File(buildDir, "classes/main")
    sourceSets.test.output.classesDir = new File(buildDir, "classes/test")
 }
一番下のdependenciesに以下を追加する
    compile("org.springframework.boot:spring-boot-starter-thymeleaf")
    compile("org.springframework.boot:spring-boot-devtools")
- thymeleaf => テンプレートエンジンのthymeleafを使う
- spring-boot-devtools => オートリロードを有効にする
オートリロードの設定
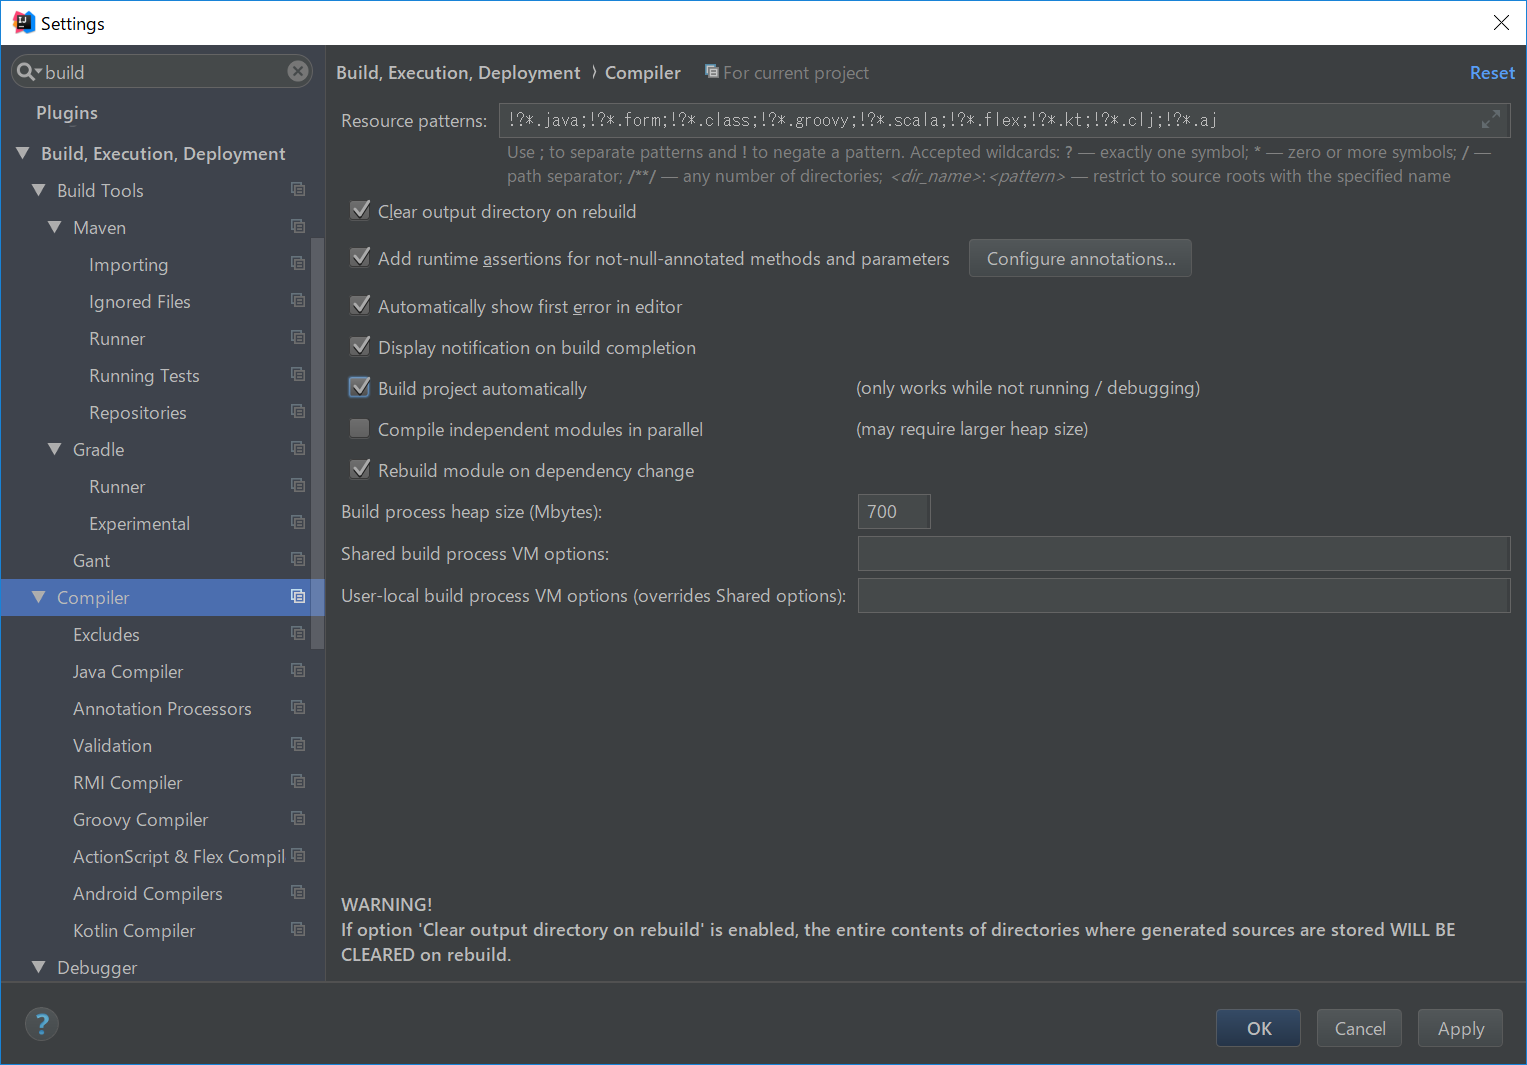
Setting -> Build -> Compilerを開き、Build project automaticallyにチェックを入れてApply
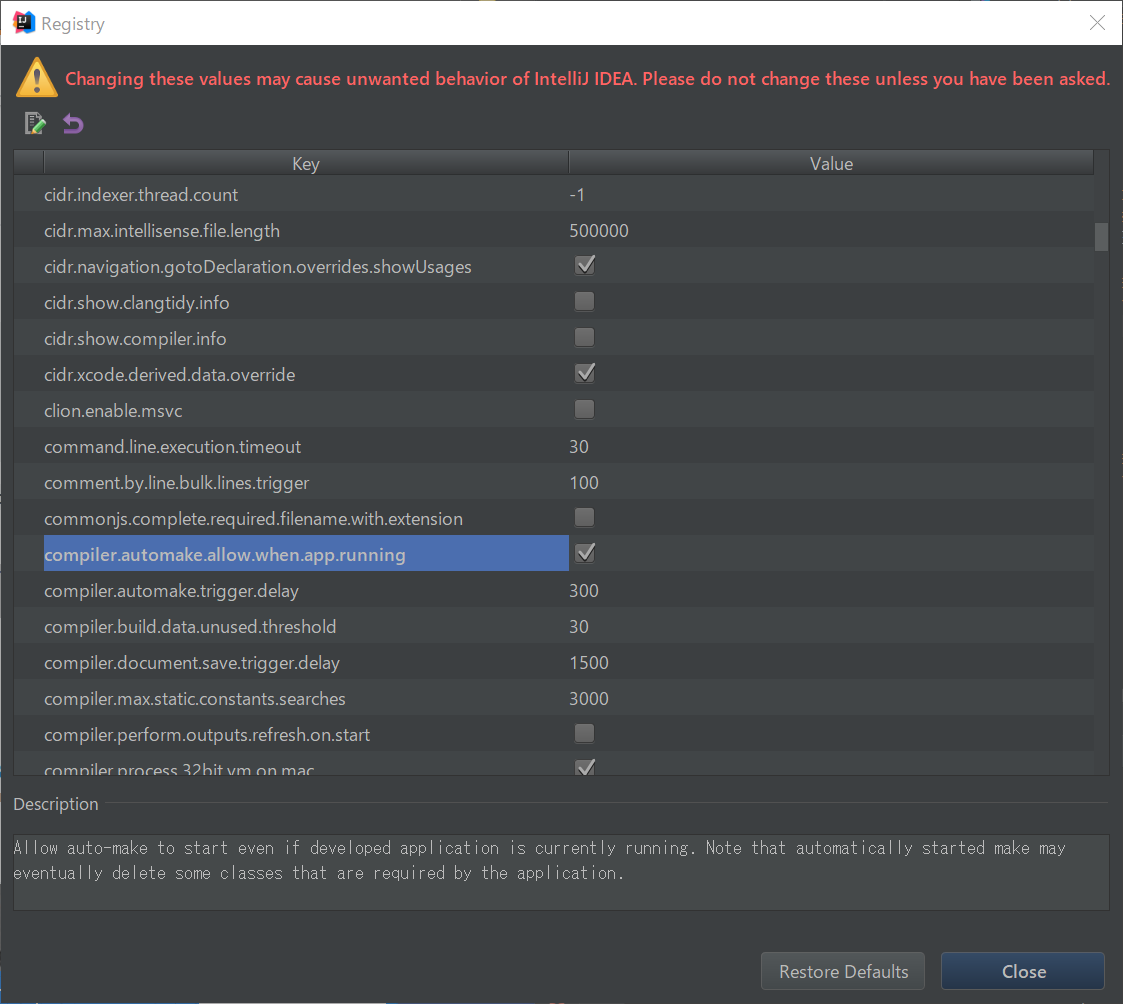
Windowsの場合:Sthif + Ctrl -> A
Macの場合:Command + Ctrl + A
でウィンドウを開き、Registry..で検索
開いたウィンドウでcompiler.automake.allow.when.app.runningにチェックを入れる
ThymeleafでHTMLを返す
Controllerの作成
com.example.demoの下にcontrollerパッケージを作成する。
controllerパッケージの下に、GreetingController.ktを作成する。
package com.example.demo.controller

import org.springframework.stereotype.Controller
import org.springframework.ui.Model
import org.springframework.web.bind.annotation.GetMapping
import org.springframework.web.bind.annotation.RequestMapping
import org.springframework.web.bind.annotation.RequestParam

@Controller
@RequestMapping("greeting")
class GreetingController {

    @GetMapping("/hello")
    fun hello(
            @RequestParam(value = "name", required = false, defaultValue = "world") name: String,
            model: Model): String {
        model.addAttribute("name", name)
        return "greeting"
    }
}
html(Thymeleaf)の作成
src/main/resources/templatesの下にgreeting.htmlを作成する
<!DOCTYPE html>
<html xmlns:th="http://www.thymeleaf.org">
<head>
    <meta charset="UTF-8" http-equiv="Content-Type" content="text/html" />
    <title>Getting Started: Saving Web Content</title>
</head>
<body>
    <p th:text="'Hello, ' + ${name} + '!'" />
</body>
</html>
動作確認
再度Spring Bootを実行する
Webブラウザでhttp://localhost:8080/greeting/helloにアクセス

http://localhost:8080/greeting/hello?name=hogeにしてみると、
表示がHello, Hoge!に変わる。
DB環境準備
Virtual Box / Vagrantのインストール
※Windows10 Homeで作業したためDocker for Windowsが使えないので仕方なくVirtual Box / Vagrantを使っています。 Windows10 ProやMacの方はDockerで構築する方が楽なので、VirtualBox / Vagrantの章は飛ばしてdocker-composeからはじめてOKです
Virtual Box https://www.virtualbox.org/
Vagrant https://www.vagrantup.com/downloads.html
プラグインのインストール
$ vagrant plugin install vagrant-vbguest
CentOS7のBoxをインストール・起動
cd [任意のディレクトリ]
vagrant init centos/7
Vagrantfileが生成されるので、ポートフォワード・IPアドレスのバインディングを設定する
# 以下の設定を追加する
  config.vm.network "forwarded_port", guest: 3306, host: 3306
  config.vm.network "private_network", ip: "192.168.33.10"
vagrant up

# 終わったら↓でrunningになっていることを確認
vagrant status

# vagrantに接続する
vagrant ssh
Vagrant上のCentOS7にDockerをインストール
https://docs.docker.com/engine/installation/linux/docker-ce/centos/
# インストール確認
docker -v
# docker起動
sudo systemctl start docker
# 動作確認
sudo docker run hello-world
# vagrant起動時にdockerが起動するように
sudo systemctl enable docker
一般ユーザーでもdockerコマンドを使えるようにする
sudo gpasswd -a $USER docker
sudo systemctl restart docker

# 一度再ログインする
exit
続いてdocker-composeをインストールする ※Docker for Mac (Windows)の場合、同時にインストールされるのでスキップしてOK
https://docs.docker.com/compose/install/#install-compose
$ sudo curl -L https://github.com/docker/compose/releases/download/1.18.0/docker-compose-`uname -s`-`uname -m` -o /usr/local/bin/docker-compose

$ sudo chmod +x /usr/local/bin/docker-compose

$ docker-compose --version
docker-compose.ymlの作成
db:
  image: mysql:5.7
  ports:
    - "3306:3306"
  environment:
    MYSQL_ROOT_PASSWORD: root
  volumes_from:
    - data

data:
  image: busybox:1
  volumes:
    - /var/lib/mysql:/var/lib/mysql # macの場合、適当なディレクトリを指定する
イメージの作成
$ docker-compose up -d
$ docker-compose ps
[vagrant@localhost ~]$ docker-compose ps
     Name                  Command             State            Ports
------------------------------------------------------------------------------
vagrant_data_1   sh                            Exit 0
vagrant_db_1     docker-entrypoint.sh mysqld   Up       0.0.0.0:3306->3306/tcp
mysqlへの接続確認
$ docker exec -it vagrant_db_1 bash
# mysql -uroot -proot

# 適当にデータベースを作成しておく
mysql> create database test;
ホストマシン(Windows / Mac)からMySQLに接続してみる。
設定方法はクライアント次第だけどこんな感じでつながるはず
※Vagrantを使わない場合はHostは172.0.0.1
| 項目 | 設定値 |
|---|---|
| Host | 192.168.33.10 |
| Database | test |
| User | root |
| Password | root |
適当にテーブルを作っておく
CREATE TABLE anything(
  id INT PRIMARY KEY AUTO_INCREMENT,
  name VARCHAR(255),
  updated_at TIMESTAMP NOT NULL DEFAULT CURRENT_TIMESTAMP ON UPDATE CURRENT_TIMESTAMP,
  created_at TIMESTAMP NOT NULL DEFAULT CURRENT_TIMESTAMP
) ENGINE=INNODB AUTO_INCREMENT=1 DEFAULT CHARSET=utf8;
プロジェクトにDoma2を設定する
# repositoriesに↓を追加
    maven { url 'https://oss.sonatype.org/content/repositories/snapshots' }

# compileKotlinの前に↓を追加
processResources.destinationDir = compileJava.destinationDir
compileJava.dependsOn processResources

# dependenciesに↓を追加
    compile group: 'mysql', name: 'mysql-connector-java', version: '6.0.6'
    compile('org.seasar.doma.boot:doma-spring-boot-starter:1.0.2')
application.propertiesの設定
# JDBC
spring.datasource.url=jdbc:mysql://192.168.33.10:3306/test
# vagrantを使わない場合はこちら
# spring.datasource.url=jdbc:mysql://172.0.0.1:3306/test
spring.datasource.username=root
spring.datasource.password=root
spring.datasource.driver-class-name=com.mysql.jdbc.Driver

# DOMA
doma.dialect=mysql
doma.naming=snake_lower_case
DBアクセスの実装
src/main配下にjavaディレクトリを作成
src/main/java 配下に com.example.demo.entity, com.example.demo.daoパッケージを作成する。
以下のクラスを作成していく
package com.example.demo.entity;

import org.seasar.doma.Entity;
import org.seasar.doma.GeneratedValue;
import org.seasar.doma.GenerationType;
import org.seasar.doma.Id;
import org.seasar.doma.Table;

import java.sql.Timestamp;

@Entity
@Table(name = "anything")
public class AnythingEntity {

    @Id
    @GeneratedValue(strategy = GenerationType.IDENTITY)
    public Integer id;

    public String name;

    public Timestamp createdAt;

    public Timestamp updatedAt;
}
package com.example.demo.dao;

import com.example.demo.entity.AnythingEntity;
import org.seasar.doma.Dao;
import org.seasar.doma.Insert;
import org.seasar.doma.Select;
import org.seasar.doma.boot.ConfigAutowireable;

import java.util.List;

@ConfigAutowireable
@Dao
public interface AnythingDao {

    @Select
    List<AnythingEntity> selectAll();

    @Insert
    int insert(AnythingEntity anything);
}
===ここからkotlin配下===
com.example.demo.serviceパッケージを作成する
以下のクラスを作成する
package com.example.demo.service

import com.example.demo.dao.AnythingDao
import com.example.demo.entity.AnythingEntity
import org.springframework.stereotype.Service

@Service
class AnythingService(
        val anythingDao: AnythingDao
) {

    fun findAll(): List<AnythingEntity> {
        return this.anythingDao.selectAll()
    }

    fun insert(anything: AnythingEntity): Int {
        return this.anythingDao.insert(anything)
    }
}
package com.example.demo.controller

import com.example.demo.entity.AnythingEntity
import com.example.demo.service.AnythingService
import org.springframework.web.bind.annotation.GetMapping
import org.springframework.web.bind.annotation.RequestMapping
import org.springframework.web.bind.annotation.RequestParam
import org.springframework.web.bind.annotation.RestController

@RestController
@RequestMapping("anything")
class AnythingController(
        val anythingService: AnythingService
) {

    @GetMapping("/findAll")
    fun findAll(): List<AnythingEntity> {
        return this.anythingService.findAll()
    }

    // 本当はGetにするべきではないですが、面倒なので・・・
    @GetMapping("/insert")
    fun insert(@RequestParam(value = "name", required = false, defaultValue = "doma") name: String): String {

        val entity = AnythingEntity()
        entity.name = name
        this.anythingService.insert(entity)

        return "success"
    }
}
sqlファイルを作成する
SELECT
  *
FROM
  anything
動作確認
curlかブラウザで以下を実行 http://localhost:8080/anything/insert http://localhost:8080/anything/insert?name=fuga http://localhost:8080/anything/findAll
以下のような結果が帰ってくればOK ※上の2行でDBへのインサート、最後の行でインサートした結果を取得しています。
[{"id":1,"name":"doma","createdAt":1516459862000,"updatedAt":1516459862000},{"id":2,"name":"fuga","createdAt":1516459895000,"updatedAt":1516459895000}]
まとめ
今回はSpring Bootで開発を始める第一歩を書きました。 Doma2を使ったのは自分が触ってみたかったからです。 余裕があったら続編を書くかもしれません。